Platform Application Tutorial
- Overview
- Use Action UI for Platform
- Create the application wrapper
- Create the custom objects
- View the application from the main menu
- Grant permissions
- Add fields to the objects
- Create and test an email Trigger
- Create seed records
- Automatically create a statistical journal entry
- More extra credit
- Export the application XML
- Delete or undeploy an application
- Challenge: Add an API trigger to create a sales order
- What’s Next?
Overview
An application is a wrapper around a group of objects and menus that work together to fulfill a function. You create a Platform application using the Sage Intacct UI and Platform Services to efficiently handle unique processes for your own or other companies.
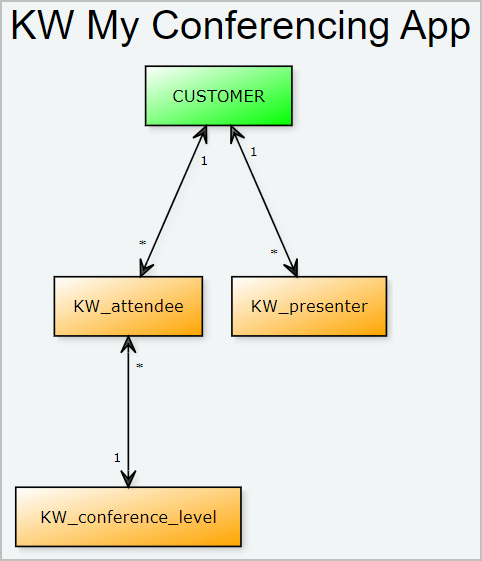
In this tutorial, we show you how to create a sample application that manages the attendees and presenters for a company conference. You will create custom data objects and then create menus, forms, and workflows for those objects. After completing the tutorial, you will have a good understanding of the capabilities of Platform Services.
Application functionality
The sample application will track attendees and presenters for a company conference. The end user for the application will be able to:
- Add attendees
- Assign corresponding customers
- Assign one of three conference levels
- Add conference presenters
- Assign corresponding customers
- Optionally modify seed records that provide conference pricing information
The application will include some automations:
- When a presenter is created, an email greeting is sent to the person.
- When an attendee is added, a statistical journal entry is automatically created.
The following shows the relationships between the application objects. Custom objects are prefaced by the KW namespace, and the standard object is shown in green.
Building the application
Here’s how we’ll build the application:
-
Create the application wrapper.
-
Create custom objects for conference attendees, conference presenters, and conference price levels.
-
Create fields and relationships for each custom object.
-
Create a trigger for sending presenters their login credentials.
-
Create a trigger for creating a a statistical journal entry when attendees are added.
Important: Do not modify a sample application to build a production solution. Always build production applications from scratch in a clean development company without other custom applications and customizations. This approach ensures you only include what you intend in your application. Also, elements of an application are tied to the company where they were developed through ID numbers. It is better to create your objects in your own development company so you have consistent ID numbers.
Use Action UI for Platform
This tutorial uses the Action UI for Platform Services. You can enable it as follows:
- From the upper right of Sage Intacct, select your user name, then select My preferences.
- Go Display layout in the new user interface and select both , choose Custom and customized pages and Platform and Customization Services.
- Select Save.
Create the application wrapper
Let’s create the basic wrapper for the application. We will use a namespace to avoid potential name collisions with other third-party applications or with Sage Intacct.
-
Go to Platform Services > Platform tools > + Applications.
-
On the Application Properties page that appears, leave This application is deployed checked.
This selection makes the application visible to end users and allows us to see the application menus and pages and test the functionality as we go.
-
For Application name, enter
KW My Conferencing App.End users will use this menu name to access the application. KW is the namespace (short for Keyword).
-
Select Save.
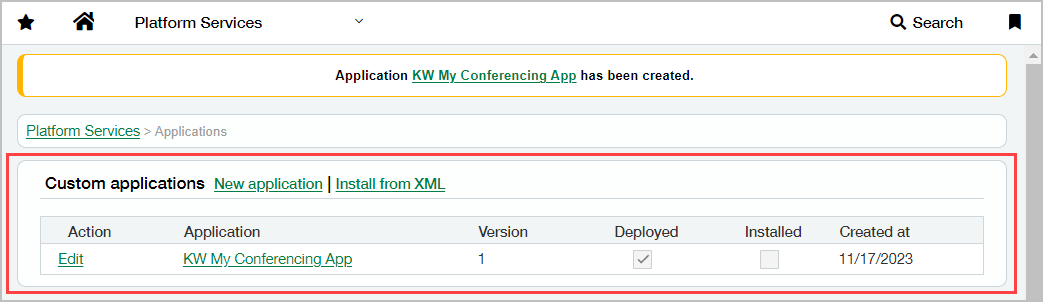
Your application is now listed under Custom applications:
-
Select KW My Conferencing App to open the Application Definition page.
The Application Definition page is where you do much of your work. It lets you create custom objects, menus, and so forth.
-
Select Edit properties to look at the application properties.
There are sections for adding Custom objects and Standard objects to your application as well as other properties.
-
Select Cancel.
Create the custom objects
Now that we created the wrapper for our application, let’s add the three custom objects:
Attendee object
Let’s create the definition of the attendee object. We’ll use the best practice of providing a namespace for the object and tracking any changes for the audit log.
-
From the Application Definition page, select Objects in the banner:

If you need to get back to the Application Definition page, go to Platform Services > Platform tools > Applications and select KW My Conferencing App.
-
Select New object.
-
On the Object Properties & Attributes page that appears, leave the Status options unchecked.
-
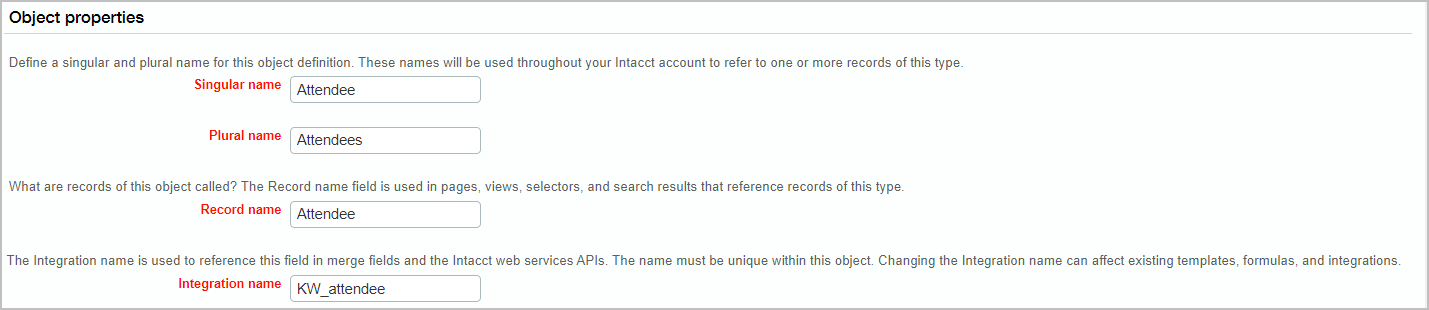
Enter
Attendeeas the Singular name for the object. -
Select outside the field and note that the other name fields are autofilled.
-
Change the Integration name to
KW_attendee.Using the namespace is important for avoiding name collisions with other objects.
-
Under Optional object properties, select Audit trail so there will be a history of when records of this type are created.
-
Scroll down and notice that Create a new menu for this object and KW My Conferencing App are checked, then select Save.
-
In the New Menu page that appears, note that KW My Conferencing App is checked and select Save.
A page that lists all Platform Services objects appears.
-
Scroll down and locate the new object. The ID number for your object will likely be different.

Conference level object
Let’s use a slightly different approach to create the next object. We’ll create the object first, then add it to the application afterwards.
-
Go to Platform Services > + Objects.
-
Enter
Conference Levelas the Singular name for the object. -
Change the Integration name to
KW_conference_level. -
Check the Audit trail property.
-
Under Add to applications, select KW My Conferencing App, then select Save.
-
In the New menu page that appears, select KW My Conferencing App under Add to applications and select Save.
Presenter object
We need to track the presenters for our conference, so let’s add an object to do so.
-
Go to Platform Services > + Objects.
-
Enter
Presenteras the Singular name for the object. -
Change the Integration name to
KW_presenter. -
Check the Audit trail attribute.
-
Under Add to applications, select KW My Conferencing App, then select Save.
-
In the New menu page that appears, select KW My Conferencing App under Add to applications and select Save.
View the application from the main menu
Let’s confirm that the application is now available in the menus:
-
Reload your browser page.
-
Go to the Applications menu and choose KW My Conferencing App to see the new menus:
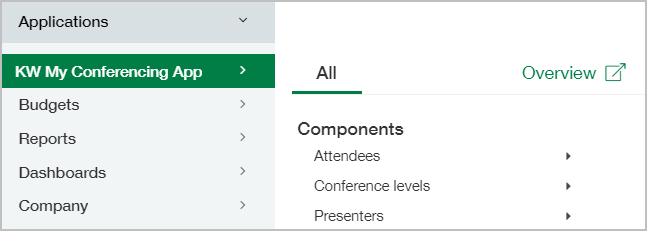
As you continue to work on the application, you will access it in different ways. You can work from the Platform Service menus, like Platform Services > Objects or Platform Services > Platform tools > Applications. You can also access the definitions and properties for your custom objects from the end-user menus we looked at here. More on this later.
Grant permissions
As the application developer, we can see the application and its menus without setting any permissions. However, other users need permissions for to access the application. How you approach this depends on whether your company has user-based or role-based permissions (see Role-based vs. user-based permissions in the Sage Intacct product help). This example assumes role-based permissions.
-
Locate or create a test user that you can log in as.
-
Go to Company > Admin > Roles.
-
Because the role for our new app was system-generated it will look like this:
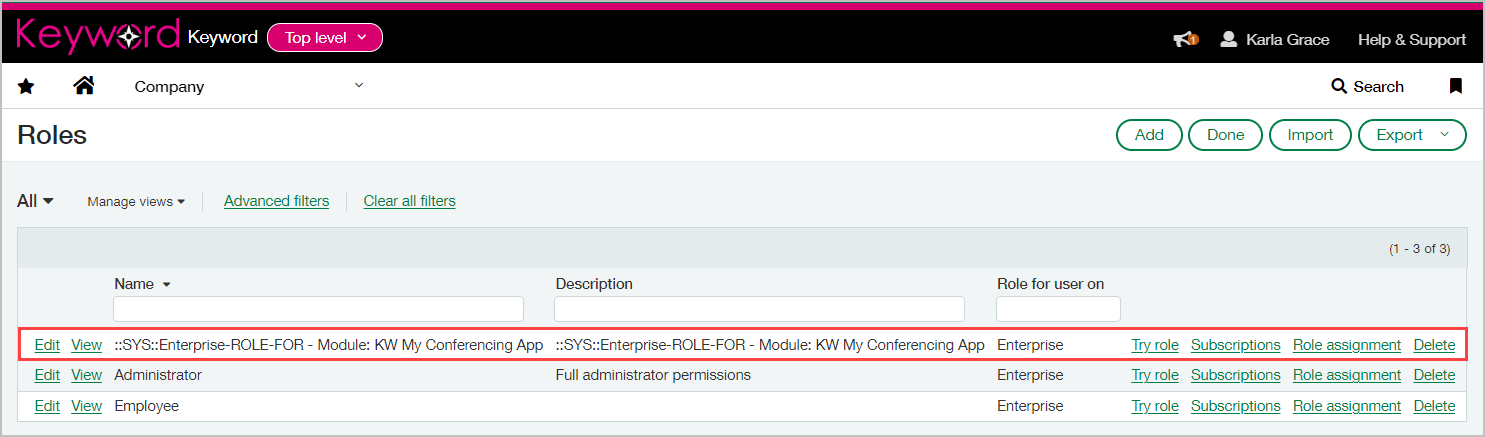
-
On the line for the conferencing app, select Role assignment.
Notice that your user is not assigned to the role yet.
-
Select Close.
-
Go to Company > Admin > Users.
-
On the line for your new user, select Edit.
-
Select Roles information.
-
Select into a new Role name field and use the dropdown to select KW My Conferencing App.
It will appear in the dropdown as something like this: ::SYS::Enterprise-ROLE-FOR - Module: KW My Conferencing App
-
Select Save.
Enter your password.
Log in again as the new user. KW My Conferencing App is available in the menu. Remember to log out and log in again as yourself.
Tip: When you create production applications for clients, you need to provide information about how end users can set up their permissions for using the application.
Add fields to the objects
Now that we have our three objects, let’s create fields on the objects to provide the functionality we want.
Tip: Because we used namespaces for our custom objects, we are already protected from name collisions on fields—there is no need to use namespaces. However, when you add custom fields to standard objects, you should use namespaces.
Attendee fields
Recall that we need to add the following:
- Attendee name
- Customer (relationship)
- Conference level (relationship)
Create the Attendee name field
-
Go to Platform Services > Platform tools > Applications and select KW My Conferencing App.
-
In the shortcuts banner at the top of the page, select Objects .
-
Under Selected Objects, select Attendee. (Select Attendee, not Edit.)
This opens the Object definition page.
-
In the Component list shortcuts banner, select Fields.
Note that our object already has fields that Intacct automatically added, such as Attendee, Comments, Created At, and so forth.
-
Select New Field.
-
For type, select Text and Next.
-
Enter Attendee name as the field label.
-
Check This field is required in all forms and select Save.
-
The Add to pages and views screen displays various pages so that end users can perform actions like create, view, edit, and so forth.
-
Under Views, select All Attendees, then select Save.
Create the Email field
Let’s use a different approach to access the object definition this time.
-
From the main menus, go to KW My Conferencing App > Attendees > Attendees.
-
Select Object definition in the upper right of the lister page.
-
Select Fields in the Component list shortcuts banner.
-
Select New field at the top of the list.
-
Select Email for the type and select Next.
-
Enter Email as the field label.
-
Check This field is required in all forms and select Save.
-
In the Add to pages and views screen that appears, select Save to accept the defaults.
Create the relationship to customers
Now let’s add a relationship between our attendee object and the standard customer object so that attendees can be associated with existing customers.
-
From the Attendee Object Definition, go to the Component list shortcuts banner and select Relationships.
-
Select New relationship.
-
For the Related object, select Customer [CUSTOMER], then select Next.
-
Leave the Singular and Plural names as they are.
Tip: The integration name for the relationship is not autofilled. Provide an integration name with your relationships or Intacct will auto generate a name that’s not intuitive.
-
For Integration name, enter
R_attendee_customer.We use
R_to identify the integration name as a relationship. -
For the Relationship type, choose Many attendees to one customer.
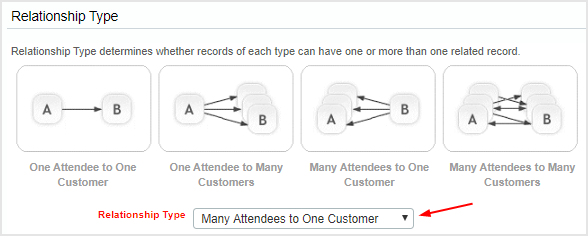
A large company might send several attendees to the conference.
-
Leave the suggested Integration names for the Lookup fields as they are (
RCUSTOMERandRKW_attendee). -
Select Save.
Create the relationship to conference levels
Now lets add a relationship between KW_attendee and KW_conference_level
-
In the Object definition page for Attendees, locate the Relationships section and select New relationship.
-
For the Related Object, select Conference level [KW_conference_level], then select Next.
-
Leave the Singular and Plural names as is.
-
Enter
R_attendee_conference_levelas the Integration name. -
For the Relationship type, choose Many attendees to one conference level.
Multiple attendees will register at the same conference level.
-
Leave the suggested Integration names for the Lookup Fields as is (
RKW_conference_levelandRKW_attendee). -
Select Save.
Unique record name
It’s recommended that you use unique record names, so let’s do that here:
-
From the Object definition page for Attendee, select Edit properties & attributes.
-
In the Available merge fields section, select Attendee name from the drop down.
-
Copy the merge token that displays and paste it into the Record name template field.
-
Use Available merge fields again and select ID.
-
Copy the merge token and paste it into the Record name template field. Add two dashes between the tokens, as shown:

-
Select Save.
View the UI for creating new attendees
Let’s take a look at how users will apply these relationships now that we’ve laid the groundwork.
-
From the main menu, go to KW My Conferencing App > Attendees > + Attendees.
-
Notice that the Attendee field, which is the record name, is read only.
This is because the record name will be automatically generated using the record name template we provided.
-
Two of the fields are text entry, and the related Customer and Conference level can be chosen with lookups.
-
Select the magnifying glass next to Customer to show the form for choosing the related customer.
-
Close the Select Customer form, then select Cancel on the New Attendee page.
Conference level fields
Recall that we need to add the following:
- Price level
- Price
Create the Price Level and Price fields
-
Open the Object definition page for Conference Level.
-
Go to the Fields section and add the following two new fields.
Field Type Field Label Field is required in all forms Add to Pages and Views Text Price level True Accept default values Currency Price True Accept default values -
(Optional) From the Object definition page, select Edit properties & attributes and set up a unique record name template like this:
{!price_level!}--{!id!}
Presenter fields
Recall that we need to add the following:
- Presenter name
- Active
- Presentation
Create the fields
-
Open the Object definition page for Presenter.
-
Scroll down to Fields and select New field.
-
Go to the Fields section and add the following new fields. (Note that there are some options for these fields that we haven’t used yet, such as default value and file extension.)
Field Type Field Label Field is required in all forms Add to Pages and Views Text Presenter name True Accept default values Field Type Field Label Default Value Add to Pages and Views Check Box Active Checked Accept default values Note: All custom objects have an
isActivefield that can be used for the same purpose as theActivefield we are adding.Field Type Field Label Field is required in all forms Add to Pages and Views Email Email True Accept default values Field Type Field Label File Extensions Add to Pages and Views File Upload Presentation .pdf Accept default values -
(Optional) From the Object definition page, select Edit properties & attributes and set up a unique record name template like this:
{!presenter_name!}--{!id!}
Extra credit - Create a relationship to customers
A presenter could certainly be a customer as well.
Using the steps above as a guide, create a comparable relationship from presenters to customers—use R_presenter_customer as the integration name for the relationship.
Create and test an email Trigger
Let’s create the email trigger now.
-
From the Presenter Object definition page, go to the Component list shortcuts banner and select Triggers then select New Trigger.
-
For Trigger type, select Send email and select Next.
-
Select This trigger is deployed.
-
Under Trigger activation, choose After create.
After creating a new presenter, the trigger will execute.
-
For Trigger name, enter
Presenter_Welcome. -
Under Trigger type properties in Use field select Email.
Note that Send to is filled in with:
{!email!} -
For Reply to, enter something like this:
noreply@nomail.com -
To the right of
Email Template, select the plus sign to add a new template. -
For Template name use
Presenter welcome email. -
For Subject, enter
Thank you for being a presenter!. -
Use a merge field to to include the name of the presenter in the email:
-
Under Available merge fields, choose Presenter, then under the Select field choose Presenter name.
Note that the merge field shows this token:
{!KW_presenter.presenter_name!} -
Copy the the token, paste it into the text editor area, and preface it with a greeting:
Hello {!KW_presenter.presenter_name!} -- -
In the actual email, the greeting will look something like the following:
Hello Jen Jones -- -
Add the following text:
We're glad that you're scheduled to present at the upcoming conference. As you know, we receive many submissions, and yours stood out as exceptional. Watch out for an email from us with instructions about your room assignment, practice session time, and AV contact information.
-
-
At the bottom of the email template page, select
Saveand on the Trigger page selectSaveagain.
Let’s test our new trigger by creating a fictitious presenter.
-
Go to KW My Conferencing App > Presenters > + Presenters.
-
Create a presenter, making sure to supply your own email address, for example:
Presenter name: Jen Jones Active: checked Email: your email address Presentation: Choose a test file Customer: Leave blank -
Save the presenter, then check your email and open the message from
noreply@nomail.com.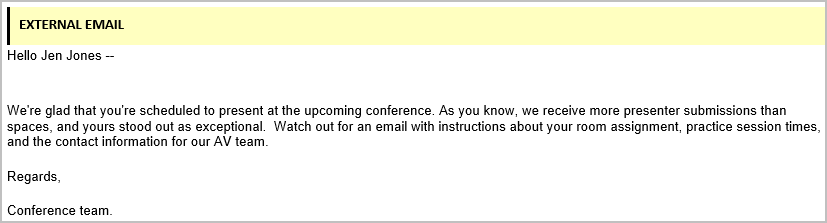
Create seed records
Let’s create some seed records. These records will represent the three primary conference price levels, but users will be able to add additional levels if necessary. For example, if the company decides later that it wants to add special pricing levels for non-profits and educational organizations, users can easily do so.
- Introductory
- Standard
- Premier
-
Go to the main menu and select KW My Conferencing App > Conference Level > + Conference Level.
-
On the page that appears, enter the following:
Price Level: Introductory Price: 1000 -
Select Save.
-
Repeat the steps for two more levels:
 Price Level: Standard
 Price: 1500
Price Level: Premier Price: 2500
Now that we have our three levels, let’s add them to the application:
-
Go to Platform Services > Platform tools > Applications and select KW My Conferencing App.
-
From the Component list shortcuts banner, select Seed records and select Attach record.
-
In the dialog that appears, choose Conference level from the dropdown.
- Select Premier, and notice the banner message at the top of the page indicating that the seed record was added.
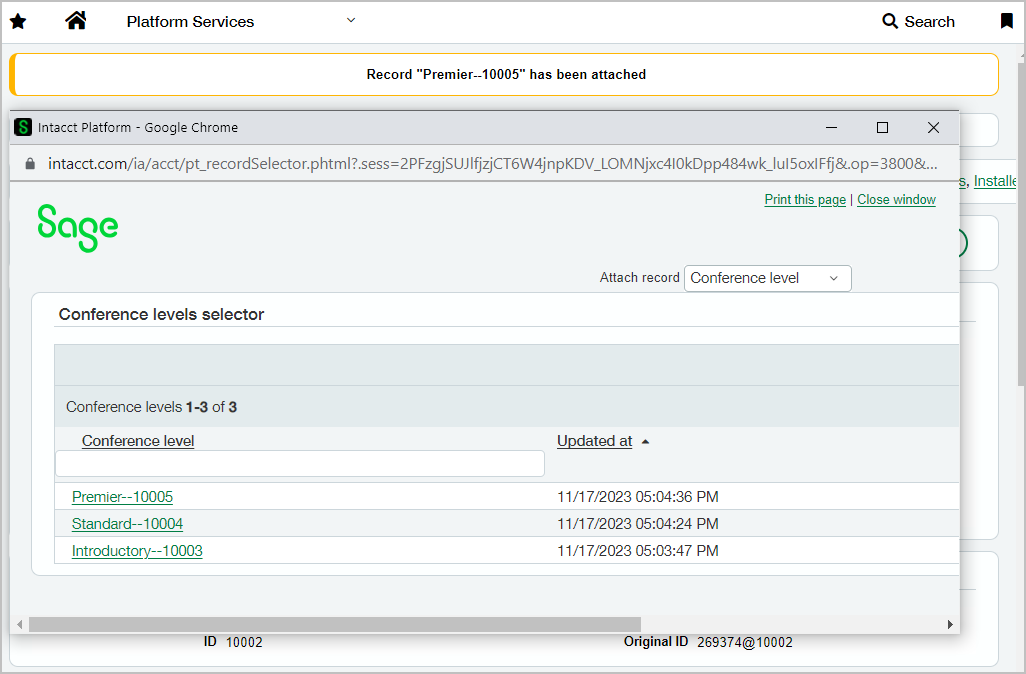
- Select the other two conference levels to add them, then select Close window in the Attach Record dialog.
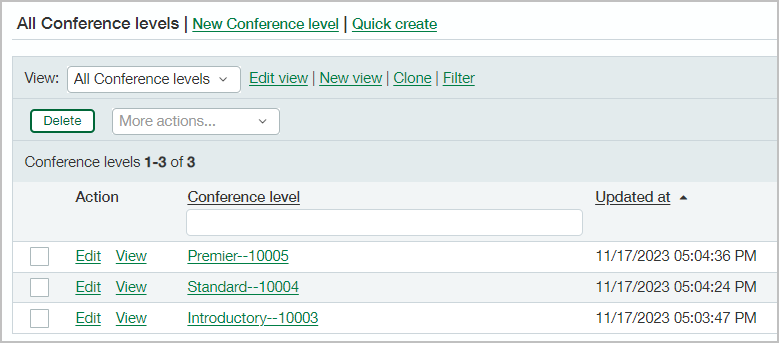
Let’s verify that the seed records are now available in the application. Go to KW My Conferencing App > Conference levels > Conference levels to open the list view:
Automatically create a statistical journal entry
API triggers provide a powerful mechanism for automating tasks.
Let’s assume we want to use an API trigger to keep a running tally of the number of conference registrations. Statistical journals are great for this purpose. A statistical journal entry simply increases or decreases a value—we can automatically create a statistical journal entry each time a new attendee is created.
Before we can create a statistical journal entry, we need to create a simple statistical account and a statistical journal we can use.
Create the statistical account
-
Go to General Ledger > All > + Statistical account.
-
Provide the following values, then slick Save.
Label Value Account number ATTD Title Conference attendance Report type Cumulative balance Status Active
Create the statistical journal
-
Go to General Ledger > Setup > + Statistical.
-
Provide the following values, then slick Save.
Label Value Symbol KW-01 Title Conference attendance Status Active
Now we are ready to work on the function.
Create the API Trigger
Here’s an example of a function that creates a statistical journal entry:
<create>
   <GLBATCH>
      <JOURNAL>KW-01</JOURNAL>
      <BATCH_DATE>03/15/2024</BATCH_DATE>
      <BATCH_TITLE>Conference registration</BATCH_TITLE>
      <ENTRIES>
         <GLENTRY>
            <ACCOUNTNO>ATTD</ACCOUNTNO>
            <CURRENCY>USD</CURRENCY>
            <TR_TYPE >1</TR_TYPE>
            <AMOUNT>1900</AMOUNT>
            <EXCH_RATE_TYPE_ID></EXCH_RATE_TYPE_ID>
            <EXCHANGE_RATE>1.5</EXCHANGE_RATE>
            <DESCRIPTION>Registration for Jen Jones for $1000</DESCRIPTION>
         </GLENTRY>
      </ENTRIES>
   </GLBATCH>
</create>
Note: If you use a multi-entity company, <LOCATION>myLocationID</LOCATION> is required for the GLENTRY in the XML (see Create Journal Entry for details).
Because we are working inside Platform Services, we don’t need to include any of the header or footer information that is required for an XML request coming in from Web Services.
Let’s create a trigger that executes the function, which is stored as a document template.
-
On the Attendee Object definition page banner, select Triggers, then select New trigger.
-
For the Trigger type, choose Intacct API and select Next.
-
Select This trigger is deployed.
-
Trigger activation, select After create.
-
For Trigger name, enter
Create_Stat_Journal. -
Under Trigger type properties, select the plus sign to add a new document template.
-
Enter
Create registration stat journalas the Template name. -
Copy the
createexample above and paste it into the code editor area. -
Use a merge field to include the name of the attendee in the description:
-
From the Available merge fields, choose Attendee as the field type and Attendee name for the field. The token displays:
{!KW_attendee.attendee_name!} -
Copy and paste the token over the name in the
Descriptionelement of the API function.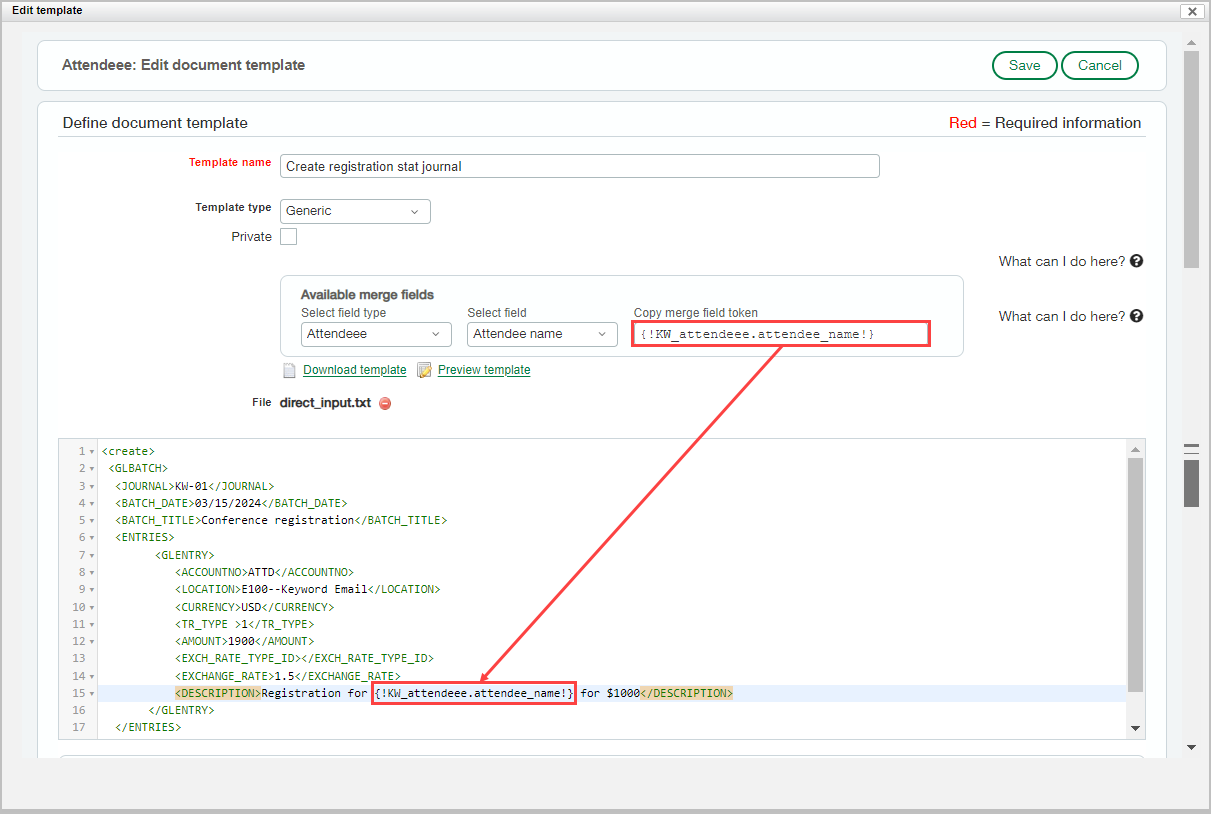
-
-
Use a merge field to include the conference price in the description:
-
From the Available merge fields, choose Related conference level as the field type and Price for the field. The token displays:
{!R_attendee_conference_level.price!} -
Copy and paste the token over the price in the
Descriptionelement of the API function.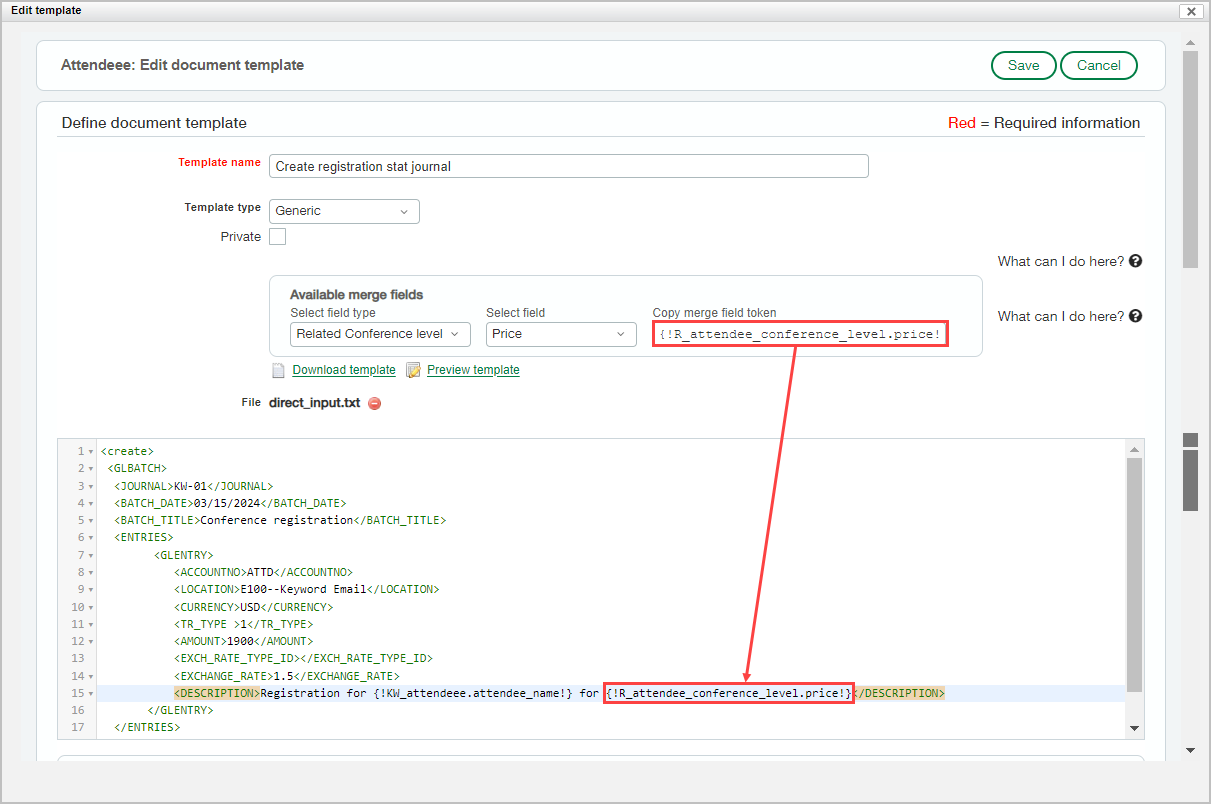
-
-
(Optional) Preview the document template with the merge fields filled in for a given attendee:
-
Select Preview template.
-
In the Attendees Selector table, select an attendee name to open the Preview.
(If you don’t yet have an attendee record, there won’t be a name to choose.)
- Close the Preview template window.
-
-
Select Save in the Create Template window.
-
Scroll to the bottom of the New Trigger page and select Save.
Test the trigger
-
Choose KW My Conferencing App > Attendees > + Attendee to create a new attendee.
-
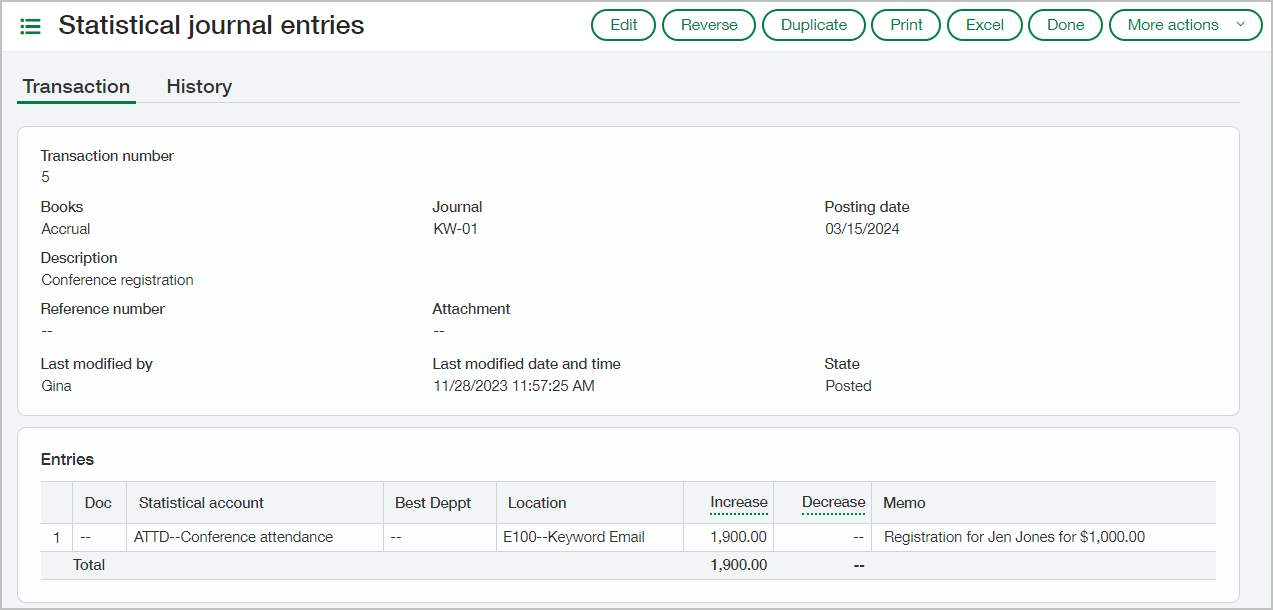
Go to General Ledger > Setup > Statistical and select View transactions for the Conference attendance journal.
-
Select view for the transaction. You should see something like this:
Troubleshooting
If you don’t see an entry, it probably means there is an issue with the API call. Here are some troubleshooting suggestions.
-
Manually create a statistical journal entry for the Conference level journal in the UI. Are other fields required? For example, do you need to supply a location? If so, modify the API call in your Document Template (accessed from the Object definition page for Attendee).
-
Try removing the merge fields in the Description and try again. If successful, you know that you need to look more closely at your merge fields to see if there are errors.
-
Confirm that you can create a statistical journal entry via the API. You can use Postman for this, as described in Your First XML API Calls.
More extra credit
If you want a challenge, consider completing the section on creating a sales order with an API trigger. Otherwise, you can skip the challenge and go onto exporting your application’s XML below.
Export the application XML
The application is now complete. Let’s export the application’s XML, which is then available for installation into a target company.
-
Go to Platform Services > Platform tools > Applications > KW My Conferencing App.
-
In the upper right, Select Publish.

-
In the page that appears, note that the application name and version are filled in for you. Also notice that Is managed is not checked – this is only a sample application, so that’s fine.
Important: For a production application, you almost always want to publish a managed application. A managed application cannot be modified after installation. If you leave an application unmanaged, users can make changes on the installed version. Once changes are made to an installed version, the application cannot be updated without potential data loss.
-
Select Generate XML to download the application’s XML definition.
Important: You should never edit an application’s XML file.
The application can now be installed in a different company. Congratulations on creating your first Platform application!
To install the application on a different development company, see Custom applications in the Sage Intacct product help.
Delete or undeploy an application
If you want to remove the sample application, you have two options:
- Undeploy it to hide it while retaining the option of restoring it later.
- Permanently delete the application after undeploying it.
Undeploy the application
-
Go to Platform Services > Platform tools > Applications.
A list of all applications appears.
-
Next to KW My Conferencing App, select Edit.
-
On the Application Definition page, select Edit properties.
-
On the Application Properties page, clear the This application is deployed checkbox, and select Save.
Delete the application
Before an application can be deleted, it must be undeployed for a period of time so that the system can update the status in the cache.
-
Undeploy the application as described above and wait a few minutes.
-
Go to Platform Services > Platform tools > Applications.
A list of all applications appears.
-
Next to KW My Conferencing App, select Del, then confirm the action by selecting the checkbox and Delete.
Challenge: Add an API trigger to create a sales order
We can create a trigger that uses an API function to create a sales order for each new attendee. Your company must have subscriptions to Order Entry and Inventory Control to create a sales order. You must also have a mechanism for sending XML API calls via Web Services.
Note: If you don’t have these subscriptions, you can read through the steps to get an idea of how to create a transaction using an API trigger.
We will use the create_sotransaction function, which will look something like this:
<create_sotransaction>
	<transactiontype>Sales Order</transactiontype>
	<datecreated>
		<year>2024</year>
		<month>3</month>
		<day>15</day>
	</datecreated>
	<customerid>CUST-198</customerid>
	<referenceno>Test</referenceno>
	<datedue>
		<year>2024</year>
		<month>4</month>
		<day>15</day>
	</datedue>
	<message>Jen Jones -- Thank you for registering for the conference!</message>
	<state>Pending</state>
	<sotransitems>
		<sotransitem>
			<itemid>Conference registration</itemid>
			<quantity>1</quantity>
			<unit>Each</unit>
			<price>100</price>
		</sotransitem>
	</sotransitems>
</create_sotransaction>
We are going to use merge fields to grab the needed parameter values. Our attendee object provides these values, but not in the format required.
For example, an attendee record has Created at field with a Date/Time format. However, we need the date broken into year, month, and day for the function call. To address this, we need to add more fields to the object definition.
Create an Inventory Control item for the sales order
We need an item in Inventory Control for the conference level in order to be able to create a sales order. This is just a placeholder item for the purposes of the tutorial.
Note: Creating the conference price levels as Inventory Control items from the start would have worked as an alternative to creating a custom Conference level object. Using a custom object worked well for demonstration purposes for this tutorial.
-
Go to Inventory Control > All > + Items.
-
Enter
Conference registrationfor the Item ID and Name. -
Choose any available Warehouse ID, then select Save.
Create a test sales order to confirm required fields
Different companies have different requirements for the parameters for create_sotransaction. For example, you will have different customers in your test company, and a multi-entity company requires currency parameters. Before continuing, confirm that you can create a sales order with the API.
Note: The date due for the sales order has to be later than the date created.
-
Use Postman (or your preferred mechanism) for sending Web Services API functions to your company to verify a working
create_sotransactionfunction. Use the example above as a model.If you need help, see Your First XML API Calls.
-
Save your working function, either in Postman or in a text editor.
-
Use another XML function call to list attendees:
<readByQuery> <object>KW_Attendee</object> <fields>*</fields> <query/> <pagesize>100</pagesize> </readByQuery> -
Note the format for the
createdAtvalue:<createdAt>2024-12-13T17:28:49Z</createdAt>
Add Year created field
Let’s use the createdAt field to get the pieces that we need for the create_sotransaction function. Will will add formula fields to the Attendee object to accomplish this.
-
Open the Attendee object definition and locate the Fields section.
-
Create a field for accessing only the creation year.
-
Select New field at the top of the list.
-
Select Formula for the type and select Next.
-
Enter Year created for the field label, and Integer for the Formula return type.
-
Enter the following JavaScript in the formula field. We are using a JavaScript UTC function (
getUTCFullYear) so that time zones are handled.return new Date("{!KW_attendee.createdAt!}").getUTCFullYear(); -
Select Check it for errors to validate the formula.
-
Select the magnifying glass, and choose an existing attendee to see exactly what will be returned. The result at the bottom should show just the year.
-
Close the dialog, then select Save on the New Field page.
-
Accept the defaults for the Add to Pages and Views dialog.
-
Add Month created and Day created fields
-
Using the above instructions, create two more fields for Attendee as follows:
Field Type Field Label Formula Return Type Formula Pages and Views formula Month created Integer return new Date("{!KW_attendee.createdAt!}").getUTCMonth() + 1;Accept defaults formula Day created Integer return new Date("{!KW_attendee.createdAt!}").getUTCDate();Accept defaults Note: The
+1for the month is to adjust for the fact the the Javascript getUTCMonth function returns January as 0, February is 1, and so forth.
Add Due date fields
Now we need to create three comparable fields for the pieces the comprise the date due for the sales order. Let’s use one month past the creation date as the due date.
Note that you could use a net term of 30 to accomplish the same task, but we are working through this exercise as a learning experience.
-
Create a new Year due formula field on the attendee object that returns an integer type and uses the following formula:
var d = new Date("{!KW_attendee.createdAt!}"); d.setMonth(d.getUTCMonth() + 1); // Add one month return d.getUTCFullYear(); -
Create Month due and Day due fields:
Field Type Field Label Return Type Formula Pages and Views formula Month due Integer return new Date("{!KW_attendee.createdAt!}").getUTCMonth() + 1;Accept defaults formula Day due Integer return new Date("{!KW_attendee.createdAt!}").getUTCDate();Accept defaults
Create the API trigger
Now that the Attendee has the fields we need, let’s create a trigger for the API call.
-
On the Attendee Object definition page banner, select Triggers, then select New trigger.
-
Set up the trigger:
-
For the Trigger type, choose Intacct API and select Next.
-
Select This trigger is deployed.
-
For Trigger activation, select After create.
-
For Trigger name, enter
Create_Sales_Order.
-
-
Under Trigger type properties, select the plus sign to add a new document template.
-
Enter
Conference registration sales orderas the Template name. -
Paste your working
create_sotransactionfunction (created above) into the code editor area. -
Use a merge field to include the year created for the date due:
-
Under Available merge fields, choose Attendee as the field type and Year created for the field. The token displays:
{!KW_attendee.year_created!} -
Copy and paste the token into the
yearchild element ofdatecreatedinto the code editor area.
-
-
Use the same approach for the
monthanddayelements:<month>{!KW_attendee.month_created!}</month> <day>{!KW_attendee.day_created!}</day> -
Set up the
datedueelements as follows:<datedue> <year>{!KW_attendee.year_due!}</year> <month>{!KW_attendee.month_due!}</month> <day>{!KW_attendee.day_due!}</day> </datedue> -
From the Available merge fields, choose Related conference level, then set up the
priceelement as follows:<price>{!R_attendee_conference_level.price!}</price> -
From the Available merge fields, choose Attendee, then set up the
customeridelement as follows:<customerid>{!KW_attendee.RCUSTOMER!}</customerid> -
Provide the transaction type (must be a valid transaction type in the company):
<transactiontype>Sales Order</transactiontype> -
Just to make it easy for us to find a sales order during our testing, use an easy-to-find field name for
referenceno:<referenceno>ABC test</referenceno> -
Fill in any other missing parameters and select Save.
Your completed call will look something like this:
<create_sotransaction> <transactiontype>Sales Order</transactiontype> <datecreated> <year>{!KW_attendee.year_created!}</year> <month>{!KW_attendee.month_created!}</month> <day>{!KW_attendee.day_created!}</day> </datecreated> <customerid>A11</customerid> <referenceno>ABC test</referenceno> <datedue> <year>{!KW_attendee.year_due!}</year> <month>{!KW_attendee.month_due!}</month> <day>{!KW_attendee.day_due!}</day> </datedue> <state>Pending</state> <sotransitems> <sotransitem> <itemid>Conference registration</itemid> <warehouseid>East</warehouseid> <quantity>1</quantity> <unit>Each</unit> <price>{!R_attendee_conference_level.price!}</price> </sotransitem> </sotransitems> </create_sotransaction> -
Scroll to the bottom of the New Trigger page and select Save.
Test the trigger
-
Create a new attendee in the application.
-
Go to Order Entry > All > OE Sales Order and search for the new transaction by Reference number,
ABC test.
Troubleshooting
If the Sales Order is not found, it means there was an issue with the API call. You can’t debug the call inside Platform Services, but you can use Postman to help figure out the problem:
-
Go back to your original working
create_sotransactioncall with the hard coded parameter values in Postman. -
Compare this version to the template version of the call and look for discrepancies.
-
If you don’t see any issues, begin replacing the merge-field values in the template with the appropriate hard-coded values from your working call. Each time you do this, upload the updated template and create another attendee. Repeat this until the sales order is created. This means the last replaced merge field was problematic.
What’s Next?
- Other script examples
- Platform Services in the Sage Intacct product help